[toc]
nginx访问控制
访问控制类别
基于IP的访问控制
http_access_module基于用户登陆认证的访问控制
http_auth_basic_module
1.1 基于IP的访问控制
语法:
- allow|deny address
1.1.1 访问控制配置示例1, 拒绝指定的IP,其他全部允许
location /nginx_status {
    stub_status;
    access_log off;
    deny 10.0.0.51;
    allow all;
}
10.0.0.51访问,权限拒绝
$ curl www.abc.com/nginx_status
<html>
<head><title>403 Forbidden</title></head>
<body>
<center><h1>403 Forbidden</h1></center>
<hr><center>nginx/1.18.0</center>
</body>
</html>
10.0.0.52访问,可以访问
$ curl www.abc.com/nginx_status
Active connections: 1
server accepts handled requests
 26 26 31
Reading: 0 Writing: 1 Waiting: 0
1.1.2 访问控制配置示例2,只允许谁能访问,其它全部拒绝
location / {
    root /website;
    index index.php index.html index.htm;
    allow 192.168.9.0/24;
    allow 10.0.0.51;
    deny  all;
}
10.0.0.51访问,可以访问
$ curl www.abc.com
www.abc.com 的网站根目录
10.0.0.52访问,权限拒绝
$ curl www.abc.com
<html>
<head><title>403 Forbidden</title></head>
<body>
<center><h1>403 Forbidden</h1></center>
<hr><center>nginx/1.18.0</center>
</body>
</html>
http_access_module局限性
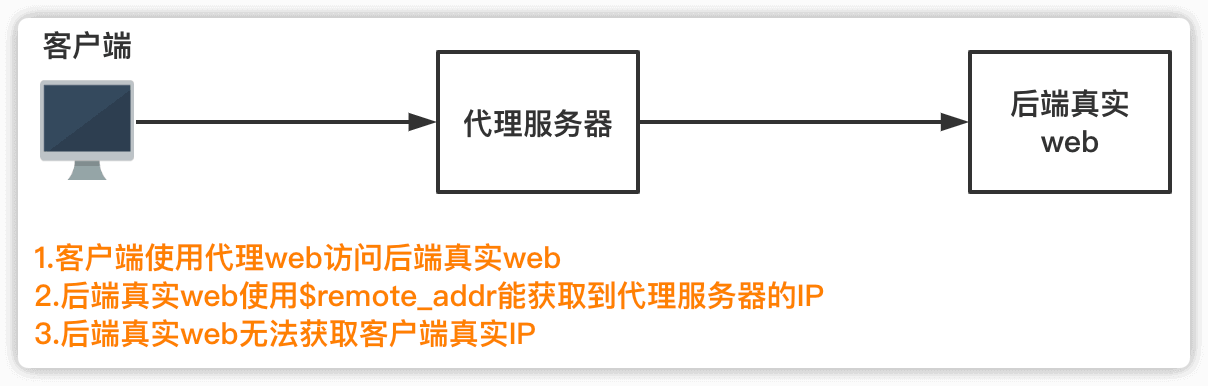
当客户端通过代理服务器访问真实的后端服务器时,通过remote_addr能获取到代理服务器的IP地址,但是无法获取客户端的IP地址
在nginx主配置文件/etc/nginx/nginx.conf中访问日志格式有如下定义
log_format  main  '$remote_addr - $remote_user [$time_local] "$request" '
                      '$status $body_bytes_sent "$http_referer" '
                      '"$http_user_agent" "$http_x_forwarded_for"';
nginx访问日志/var/log/nginx/access.log中如下,可以看到使用$remote_addr可以获取直接访问后端真实web的代理服务器的IP,但是最后边的"-"表明无法获取真实客户端的IP
10.0.0.51 - - [16/Jun/2020:00:27:30 +0800] "GET / HTTP/1.0" 200 10 "-" "curl/7.29.0" "-"
现在在代理服务器和后端真实web中的nginx头文件proxy_params中加上参数X-Forwarded-For以获取客户端真实IP,然后模拟访问过程如下
客户端10.0.0.10-->通过代理服务器10.0.0.51-->访问后端真实web 10.0.0.52
代理服务器10.0.0.51 nginx配置
#编辑nginx反向代理配置文件
cat > /etc/nginx/conf.d/www.abc.com.conf <<EOF
server {
    listen 80;
    server_name www.abc.com;
    index index.html index.htm;

    location / {
        proxy_pass http://10.0.0.52;
        include proxy_params;
    }
}
EOF

#编辑nginx头文件,加上参数X-Forwarded-For
cat > /etc/nginx/proxy_params <<'EOF'
proxy_set_header Host $http_host;
proxy_set_header X-Real-IP $remote_addr;
proxy_set_header X-Forwarded-For $proxy_add_x_forwarded_for;

proxy_connect_timeout 30;
proxy_send_timeout 60;
proxy_read_timeout 60;

proxy_buffering on;
proxy_buffer_size 32k;
proxy_buffers 4 128k;
EOF
后端真实web 10.0.0.52操作
#编辑nginx配置文件
cat > /etc/nginx/conf.d/www.abc.com.conf <<EOF
server {
listen 80;
server_name www.abc.com;
location / {
root /website;
index index.html index.htm;
include proxy_params;
}
}
EOF
#编辑nginx头文件,加上参数X-Forwarded-For
cat > /etc/nginx/proxy_params <<'EOF'
proxy_set_header Host $http_host;
proxy_set_header X-Real-IP $remote_addr;
proxy_set_header X-Forwarded-For $proxy_add_x_forwarded_for;
proxy_connect_timeout 30;
proxy_send_timeout 60;
proxy_read_timeout 60;
proxy_buffering on;
proxy_buffer_size 32k;
proxy_buffers 4 128k;
EOF
#创建网站�根目录
mkdir /website && echo '10.0.0.52' >/website/index.html
加上X-Forwarded-For 参数后,nginx的访问日志中就可以获取到客户端的真实IP地址了
10.0.0.51 - - [16/Jun/2020:10:35:12 +0800] "GET / HTTP/1.0" 200 10 "-" "curl/7.29.0" "10.0.0.10"
1.2 基于用户登陆认证的访问控制
可在http、server、location下添加如下内容即可
auth_basic "Auth access down Input your Passwd!";
auth_basic_user_file /etc/nginx/auth_file;
配置示例
#安装包
yum -y install httpd-tools

#创建一个用户名为test密码为123的登陆认证用户,同时将密码存放于/etc/nginx/auth_conf
htpasswd -b -c /etc/nginx/auth_file test 123

#编辑nginx配置文件
location / {
        root /website;
        auth_basic "Auth access down Input your Passwd!";
        auth_basic_user_file /etc/nginx/auth_file;
        autoindex on;
        autoindex_exact_size off;
        autoindex_localtime on;
        charset utf-8,gbk;
        index index.php index.html index.htm;
    }
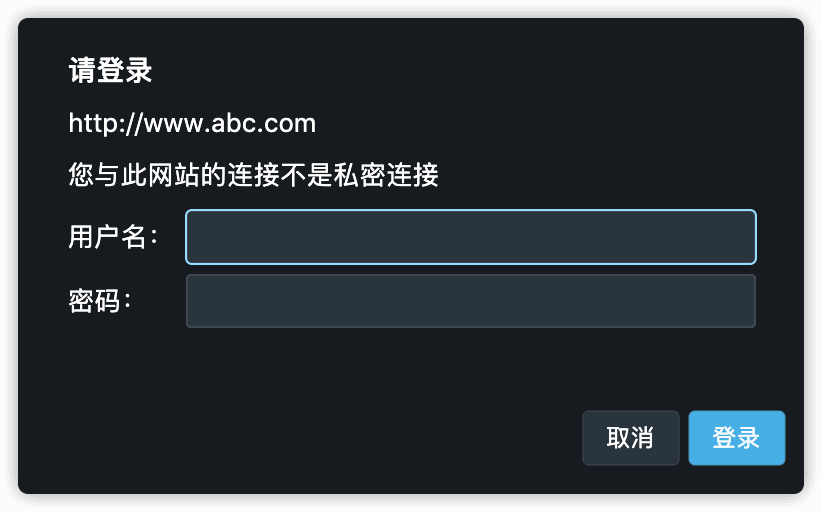
浏览器访问提示需要输入用户名和密码
1.3 基于配置参数的访问控制
ngx_http_limit_conn_module模块可以根据定义的key来限制每个键值的连接数
因为一次tcp连接可以建立多次http请求连接,因此http请求连接要比tcp连接限制更准确
-
limit_conn_module 连接频率限制,TCP连接
-
limit_req_module 请求频率限制,http请求连接
http协议的连接与请求
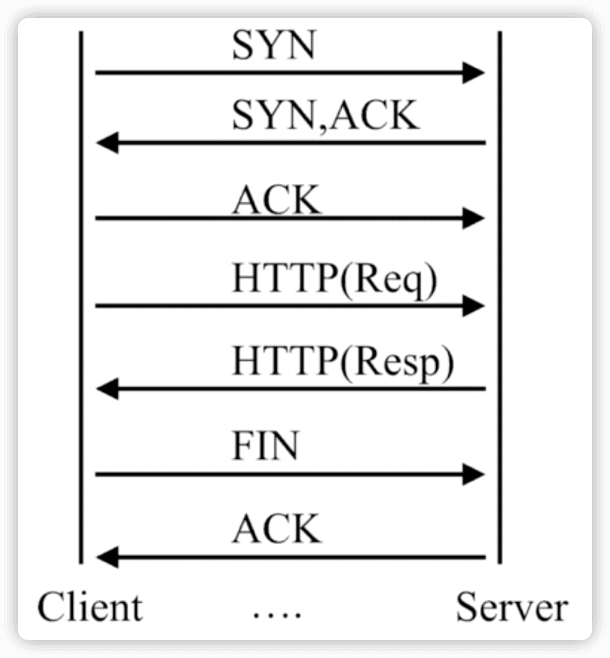
HTTP是建立在TCP连接之上, 在完成HTTP请求需要先建立TCP三次握手(称为TCP连接),在连接的基础上再发起HTTP请求。
HTTP请求建立在一次TCP连接基础上,一次TCP请求至少产生一次HTTP请求
1.3.1 nginx连接限制配置 limit_conn_module
配置示例
# 在nginx主配置文件nginx.con中http模块下加入 limit_conn_zone
http {
    # http段配置连接限制, 同一时刻只允许一个客户端IP连接
    # 定义一个名为 conn_zone 的limit_conn用来存储session,大小是10M内存,以$binary_remote_addr为key
    limit_conn_zone $binary_remote_addr zone=conn_zone:10m;
}

# 在xxx.conf中加入limit_conn
server {
    location / {
    # 同一时刻只允许10个客户端IP连接
        limit_conn conn_zone 10;
    }
}
1.3.2 nginx请求限制配置 limit_req_module
如何设置能限制某个IP某一时间段的访问次数是一个让人头疼的问题,特别面对恶意的ddos攻击的时候。其中CC攻击(Challenge Collapsar)是DDOS(分布式拒绝服务)的一种,也是一种常见的网站攻击方法,攻击者通过代理服务器或者肉鸡向向受害主机不停地发大量数据包,造成对方服务器资源耗尽,一直到宕机崩溃。
cc攻击一般就是使用有限的ip数对服务器频繁发送数据来达到攻击的目的,nginx可以通过
HttpLimitReqModul和HttpLimitZoneModule配置来限制ip在同一时间段的访问次数来防cc攻击。
HttpLimitReqModul用来限制连单位时间内连接数的模块,使用limit_req_zone和limit_req指令配合使用来达到限制。一旦并发连接超过指定数量,就会返回503错误。
HttpLimitConnModul用来限制单个ip的并发连接数,使用limit_zone和limit_conn指令这两个模块的区别前一个是对一段时间内的连接数限制,后者是对同一时刻的连接数限制
配置示例
# 在nginx主配置文件nginx.con中http模块下加入 limit_req_module
http {
    # http段配置连接限制, 1r/s只接收一个请求,其余请求拒绝处理并返回错误码给客户端
    # 定义一个名为req_zone的limit_req_zone用来存储session,大小是10M内存,以$binary_remote_addr为key,限制平均每秒的请求数为20个
    # 1M能存储16000个状态,rate的值必须为整数
    # 如果限制2秒一个请求,可以设置成30r/m
    limit_req_zone $binary_remote_addr zone=req_zone:10m rate=20r/s;
}

# 在xxx.conf中加入 limit_req
server {
    location / {
        # 限制ip每秒不超过20个请求,漏桶数burst为5,burst的意思就是,如果第1秒、2、3、4秒请求为19个,第5秒的请求为25个是被允许的,但是如果第1秒就有25个请求,则第2秒超过20的请求返回503
        # nodelay,如果不设置该选项,则严格使用平均速率限制请求数,第1秒为25个请求,5个请求会被放到第2秒执行;如果设置了nodelay,则25个请求在第1秒执行
        limit_req zone=req_zone burst=5 nodelay;
    }
}
在终端中快速重复访问,就可以看到有503的报错
[root@test1 ~]# curl www.abc.com
www.abc.com 的网站根目录
[root@test1 ~]# curl www.abc.com
www.abc.com 的网站根目录
[root@test1 ~]# curl www.abc.com
<html>
<head><title>503 Service Temporarily Unavailable</title></head>
<body>
<center><h1>503 Service Temporarily Unavailable</h1></center>
<hr><center>nginx/1.18.0</center>
</body>
</html>
www.abc.com 的网站根目录
也可以用ab简单压测一下
-n 指定数量
-c 指定并发数
可以看到请求数是50,失败的数量是46,因为配置文件中请求限制为1r/s,burst=3,因此成功数量是4
$ ab -n 50 -c 10 www.abc.com/index.html
This is ApacheBench, Version 2.3 <$Revision: 1430300 $>
Copyright 1996 Adam Twiss, Zeus Technology Ltd, http://www.zeustech.net/
Licensed to The Apache Software Foundation, http://www.apache.org/

Benchmarking www.abc.com (be patient).....done


Server Software:        nginx/1.18.0
Server Hostname:        www.abc.com
Server Port:            80

Document Path:          /index.html
Document Length:        31 bytes

Concurrency Level:      10
Time taken for tests:   0.005 seconds
Complete requests:      50
Failed requests:        46
   (Connect: 0, Receive: 0, Length: 46, Exceptions: 0)
Write errors:           0
Non-2xx responses:      46
Total transferred:      18972 bytes
HTML transferred:       9186 bytes
Requests per second:    10066.44 [#/sec] (mean)
Time per request:       0.993 [ms] (mean)
Time per request:       0.099 [ms] (mean, across all concurrent requests)
Transfer rate:          3730.09 [Kbytes/sec] received

Connection Times (ms)
              min  mean[+/-sd] median   max
Connect:        0    0   0.1      0       0
Processing:     0    1   0.1      1       1
Waiting:        0    0   0.1      0       1
Total:          1    1   0.1      1       1

Percentage of the requests served within a certain time (ms)
  50%      1
  66%      1
  75%      1
  80%      1
  90%      1
  95%      1
  98%      1
  99%      1
 100%      1 (longest request)
连接限制没有请求限制有效?
http多个请求可以建立在一次TCP连接之上, 那么我们对请求的精度限制,要比对一个连接的限制会更加的有效。
因为同一时刻只允许一个连接请求进入。
但是同一时刻多个请求可以通过一个连接进入。
所以请求限制才是比较优的解决方案。