[toc]
centos7.7搭建sersync
sersync已于2015年8月停止更新,作者推荐使用lsyncd
1.sersync简介
sersync主要用于服务器同步,web��镜像等功能。基于boost1.41.0,inotify api,rsync command.开发。目前使用的比较多的同步解决方案是inotify-tools+rsync ,另外一个是google开源项目Openduckbill(依赖于inotify- tools),这两个都是基于脚本语言编写的。相比较上面两个项目,本项目优点是:
1.sersync是使用c++编写,而且对linux系统文件系统产生的临时文件和重复的文件操作进行过滤(详细见附录,这个过滤脚本程序没有实现),所以在结合rsync同步的时候,节省了运行时耗和网络资源。 因此更快。
2.相比较上面两个项目,sersync配置起来很简单,其中bin目录下 已经有基本上静态编译的2进制文件,配合bin目录下的xml配置文件直接使用即可。
3.另外本项目相比较其他脚本开源项目,使用多线程进行同步,尤其在同步较大文件时,能够保证多个服务器实时保持同步状态。
4.本项目有出错处理机制,通过失败队列对出错的文件重新同步,如果仍旧失败,则 每10个小时对同步失败的文件重新同步。
5.本项目自带crontab功能,只需在xml配置文件中开启,即可按您的要求,隔一段时间整体同步一次。无需再额外配置crontab功能。
6.本项目socket与http插件扩展,满足您二次开发的需要。
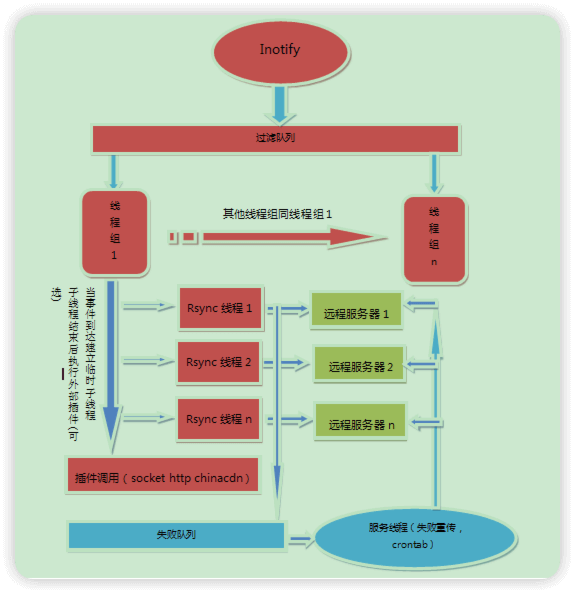
同步原理图
2.sersync搭建过程
- sersync流程
- 安装sersync的服务器角色为客户端,实时检测在sersync中配置的共享目录文件变化,采用客户端主动推送的方式将发生变化的文件传输到服务端
- sersync负责检测文件变化,真正同步文件还是rsync
试验环境
| 角色 | IP | 主机名 | 安装服务 |
|---|---|---|---|
| rsync server | 10.0.0.10 | rsync-server | rsync |
| rsync client | 10.0.0.11 | rsync-client | sersync、rsync、inotify-tools |
服务端操作
1.安装rsync
yum -y install rsync
2.编辑rsync配置文件
#备份原有文件
cp /etc/rsyncd.conf{,.bak}

#编辑rsync配置文件
cat  >/etc/rsyncd.conf <<EOF
uid = rsync
gid = rsync
port = 873
fake super = yes
use chroot = no
max connections = 200
timeout = 600
ignore errors
read only = false
list = false
hosts allow = 10.0.0.0/24
hosts deny = 0.0.0.0/32
auth users = rsync_backup
secrets file = /etc/rsync.password
log file = /var/log/rsyncd.log
#####################################
[backup]
comment = welcome to edu backup!
path = /backup
EOF


#rsync配置文件参数说明
# 全局模块
uid = rsync						    # 运行进程的用户
gid = rsync						    # 运行进程的用户组
port = 873						    # 监听端口
use chroot = no					  # 关闭假根功能
max connections = 200			# 最大连接数
timeout = 600						  # 超时时间
ignore errors						  # 忽略错误信息
read only = false					# 对备份数据可读写
list = false						  # 不允许查看模块信息
hosts allow = 10.0.0.0/24			# 允许某个IP或网段访问,*表示允许所有
hosts deny = 0.0.0.0/32				# 拒绝某个网段或IP访问,*表示拒绝所有
auth users = rsync_backup			# 定义虚拟用户,作为连接认证用户
secrets file = /etc/rsync.password	# 定义rsync服务用户连接认证密码文件路径

# 局部模块
[backup]							# 定义模块信息
comment = commit			# 模块注释信息
path = /backup				# 定义接收备份数据目录
3.建立rsync用户及共享目录
#创建rsync用户
useradd -M -s /sbin/nologin rsync

#创建真正的共享目录并修改目录所有者为rsync
mkdir /backup && chown rsync.rsync /backup
4.创建用户密码文件
⚠️**用户密码文件权限必须为600!!!**
#创建密码文件,密码文件要与/etc/rsyncd.conf中"secrets file = /etc/rsync.password"相同
echo "rsync_backup:1" > /etc/rsync.password

#修改密码文件权限,必须为600!!!
chmod 600 /etc/rsync.password
5.启动rsync并加入开机自启
systemctl start rsyncd && systemctl enable rsyncd
客户端操作
1.安装inotify-tools
yum -y install inotify-tools
2.下载sersync
#下载sersync
git clone https://github.com.cnpmjs.org/wsgzao/sersync.git

#解压缩包并重命名
tar xf sersync/sersync2.5.4_64bit_binary_stable_final.tar.gz
mv GNU-Linux-x86/ /usr/local/sersync
3.配置sersync
⚠️**13行 <delete start="false"/> 这个选项是否开启完全同步,比较危险,一般设置为false**
#查看sersync目录内容,包含配置文件confxml.xml和启动文件sersync2
$ cd /usr/local/sersync
$ pwd
/usr/local/sersync
$ ls
confxml.xml  sersync2

#配置confxml,精简版修改
13行,是否开启完全同步,比较危险,一般为false
    <delete start="false"/>

24行,配置本机共享目录
    <localpath watch="/backup">

25行,远程主机IP及rsync共享名称
    <remote ip="10.0.0.10" name="backup"/>

30行,rsync同步时命令的选项,一般默认即可
    <commonParams params="-artuz"/>

31行,指定服务端rsync配置中的认证用户及密码文件
		<auth start="true" users="rsync_backup" passwordfile="/etc/rsync.password"/>


#参数说明
-a		//归档模式传输, 等于-tropgDl
-v		//详细模式输出, 打印速率, 文件数量等
-z		//传输时进行压缩以提高效率
-r		//递归传输目录及子目录,即目录下的所有目录都同样传输
-t		//保持文件时间信息
-o		//保持文件属主信息
-p		//保持文件权限
-g		//保持文件属组信息
-l		//保留软连接
-P		//显示同步的过程及传输时的进度等信息
-D		//保持设备文件信息
-L		//保留软连接指向的目标文件
-e		//使用的信道协议,指定替代rsh的shell程序
--exclude=PATTERN		    //指定排除不需要传输的文件模式
--exclude-from=file			//文件名所在的目录文件
--bwlimit=100				//限速传输
--partial					//断点续传
--delete					//让目标目录和源目录数据保持一致

31行,开启用户认证,用户名,密码文件
<auth start="true" users="rsync_backup" passwordfile="/etc/rsync.password"/>
4.创建用户认证密码文件及共享目录
⚠️**密码文件权限必须为600!!!**
#创建用户��认证密码文件
echo 1 > /etc/rsync.password
#修改文件权限,必须为600!!!
chmod 600 /etc/rsync.password
#创建rsync用户
useradd -M -s /sbin/nologin rsync
#创建共享目录
mkdir /backup && chown rsync.rsync /backup
5.启动sersync
#启动sersync
/usr/local/sersync/sersync2 -dro /usr/local/sersync/confxml.xml

set the system param
execute:echo 50000000 > /proc/sys/fs/inotify/max_user_watches
execute:echo 327679 > /proc/sys/fs/inotify/max_queued_events
parse the command param
option: -d 	run as a daemon
option: -r 	rsync all the local files to the remote servers before the sersync work
option: -o 	config xml name:  /usr/local/sersync/confxml.xml
daemon thread num: 10
parse xml config file
host ip : localhost	host port: 8008
daemon start,sersync run behind the console
config xml parse success
please set /etc/rsyncd.conf max connections=0 Manually
sersync working thread 12  = 1(primary thread) + 1(fail retry thread) + 10(daemon sub threads)
Max threads numbers is: 22 = 12(Thread pool nums) + 10(Sub threads)
please according your cpu ,use -n param to adjust the cpu rate
------------------------------------------
rsync the directory recursivly to the remote servers once
working please wait...
execute command: cd /backup && rsync -artuz -R --delete ./ 10.0.0.12::backup >/dev/null 2>&1

#查看sersync进程
$ ps aux|grep sersyn[c]
root   2213  0.0  0.1  92324   704 ?  Ssl  15:05   0:00 /usr/local/sersync/sersync2 -dro /usr/local/sersync/confxml.xml


#启动参数说明
-d   启用守护进程模式
-r   在监控前,将监控目录与远程主机用rsync命令推送一遍
-n   指定开启守护线程的数量,默认为10个
-o   指定配置文件,默认使用confxml.xml文件
-m   单独启用其他模块,使用 -m refreshCDN 开启刷新CDN模块
-m   单独启用其他模块,使用 -m socket 开启socket模块
-m   单独启用其他模块,使用 -m http 开启http模块
不加-m参数,则默认执行同步程序
6.验证同步
#文件、目录同步验证
1.进入客户端10.0.0.10 /backup目录创建文件、目录
$ touch {1..5}.txt && mkdir dir{1..3}
$ ls
1.txt  2.txt  3.txt  4.txt  5.txt  dir1  dir2  dir3


2.服务端10.0.0.11验证,可以看到文件已经同步
$ cd /backup
$ ls
1.txt  2.txt  3.txt  4.txt  5.txt  dir1  dir2  dir3


#文件内容同步验证
1.客户端10.0.0.10 /backup中向1.txt写入内容
$ cd /backup && echo 'test sersync' >1.txt

2.服务端10.0.0.11 /backup中查看1.txt文件内容
$ cd /backup && cat 1.txt
test sersync
7.同步过程总结
sersync同步过程中需要注意的点
- sersync端需要用到rsyncd服务端配置文件中指定的认证用户的密码,并且密码文件权限必须为600
- sersync的作用其实就是实时检测本地文件,一旦有变化就把文件推送到配置文件中指定的主机
- sersync端推送文件实际上还是利用了rsync
有关密码文件的说明
- rsync认证用户:密码 一定是写在rsyncd服务端的
- 只有单纯的密码 一定是写在推送端的