containerd安装
containerd官方架构图
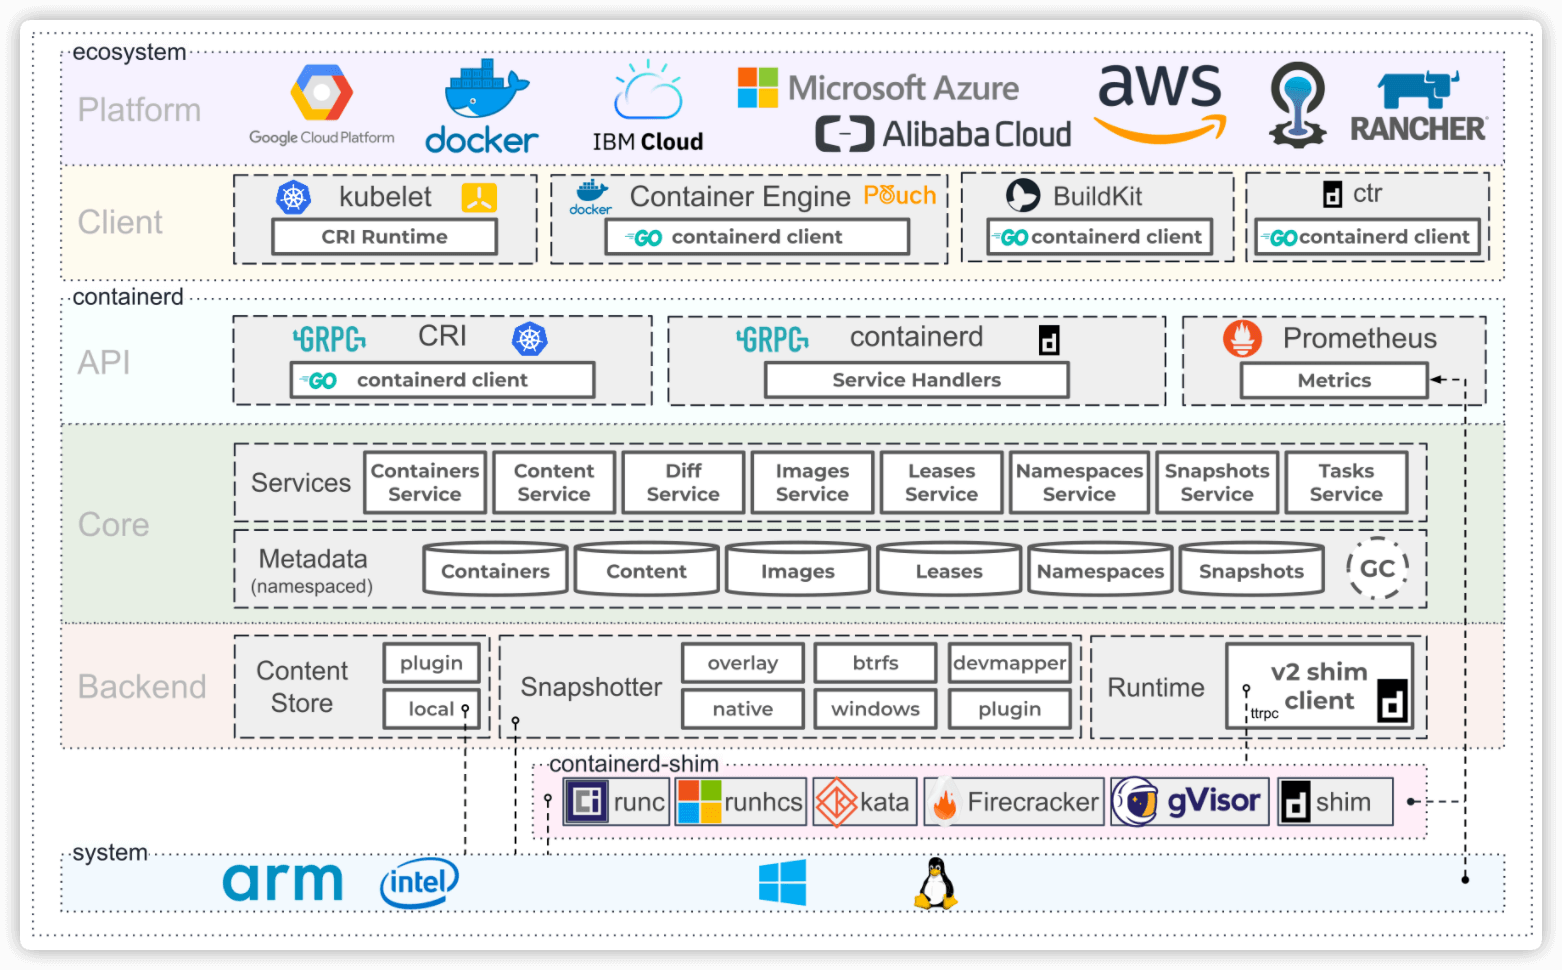
总体来看 containerd 可以分为三个大块:Storage、Metadata 和 Runtime

1.下载安装包
由于 containerd 需要调用 runc,所以我们也需要先安装 runc,不过 containerd 提供了一个包含相关依赖的压缩包 cri-containerd-cni-${VERSION}.${OS}-${ARCH}.tar.gz ,直接下载这个包即可
export CONTAINERD_VERSION=1.5.9
wget https://github.com/containerd/containerd/releases/download/v${CONTAINERD_VERSION}/cri-containerd-cni-${CONTAINERD_VERSION}-linux-amd64.tar.gz
2.解压包
tar包解压缩后是3个目录 etc 、 opt 、 usr
解压前可使用 tar -tf 命令查看包内容
tar xf cri-containerd-cni-${CONTAINERD_VERSION}-linux-amd64.tar.gz -C /
3.创建containerd配置文件
containerd 的默认配置文件为 /etc/containerd/config.toml,我们可以通过 containerd config default > /etc/containerd/config.toml 命令生成一个默认的配置
mkdir -p /etc/containerd && containerd config default > /etc/containerd/config.toml
4.修改containerd配置文件
对于使用 systemd 作为 init system 的 Linux 的发行版,使用 systemd 作为容器的 cgroup driver 可以确保节点在资源紧张的情况更加稳定,所以推荐将 containerd 的 cgroup driver 配置为 systemd
修改前面生成的配置文件 /etc/containerd/config.toml,在 plugins."io.containerd.grpc.v1.cri".containerd.runtimes.runc.options 配置块下面将 SystemdCgroup 设置为 true
修改
    SystemdCgroup = false

修改为
    SystemdCgroup = true
5.配置containerd仓库加速
需要在 cri 配置块下面的 registry 配置块下面进行配置 registry.mirrors,在 [plugins."io.containerd.grpc.v1.cri".registry.mirrors] 下边新增4行内容
[plugins."io.containerd.grpc.v1.cri".registry.mirrors]
  [plugins."io.containerd.grpc.v1.cri".registry.mirrors."docker.io"]
    endpoint = ["https://bqr1dr1n.mirror.aliyuncs.com"]
  [plugins."io.containerd.grpc.v1.cri".registry.mirrors."k8s.gcr.io"]
    endpoint = ["https://registry.aliyuncs.com/k8sxio"]

registry.mirrors."xxx": 表示需要配置 mirror 的镜像仓库,例如registry.mirrors."docker.io"表示配置docker.io的 mirror。endpoint: 表示提供 mirror 的镜像加速服务,比如我们可以注册一个阿里云的镜像服务来作为docker.io的 mirror。
修改 sandbox_image 为阿里云地址
修改
	sandbox_image = "k8s.gcr.io/pause:3.5"

修改为
	sandbox_image = "registry.aliyuncs.com/k8sxio/pause:3.5"
6.containerd存储配置说明
/etc/containerd/config.toml 配置中还有两个关于存储的配置路径
root = "/var/lib/containerd"
state = "/run/containerd"
其中 root 是用来保存持久化数据,包括 Snapshots, Content, Metadata 以及各种插件的数据,每一个插件都�有自己单独的目录,Containerd 本身不存储任何数据,它的所有功能都来自于已加载的插件。
而另外的 state 是用来保存运行时的临时数据的,包括 sockets、pid、挂载点、运行时状态以及不需要持久化的插件数据。
7.启动containerd
由于上面我们下载的 containerd 压缩包中包含一个 etc/systemd/system/containerd.service 的文件,这样我们就可以通过 systemd 来配置 containerd 作为守护进程运行了,内容如下所示
$ cat /etc/systemd/system/containerd.service
# Copyright The containerd Authors.
#
# Licensed under the Apache License, Version 2.0 (the "License");
# you may not use this file except in compliance with the License.
# You may obtain a copy of the License at
#
#     http://www.apache.org/licenses/LICENSE-2.0
#
# Unless required by applicable law or agreed to in writing, software
# distributed under the License is distributed on an "AS IS" BASIS,
# WITHOUT WARRANTIES OR CONDITIONS OF ANY KIND, either express or implied.
# See the License for the specific language governing permissions and
# limitations under the License.

[Unit]
Description=containerd container runtime
Documentation=https://containerd.io
After=network.target local-fs.target

[Service]
ExecStartPre=-/sbin/modprobe overlay
ExecStart=/usr/local/bin/containerd

Type=notify
Delegate=yes
KillMode=process
Restart=always
RestartSec=5
# Having non-zero Limit*s causes performance problems due to accounting overhead
# in the kernel. We recommend using cgroups to do container-local accounting.
LimitNPROC=infinity
LimitCORE=infinity
LimitNOFILE=infinity
# Comment TasksMax if your systemd version does not supports it.
# Only systemd 226 and above support this version.
TasksMax=infinity
OOMScoreAdjust=-999

[Install]
WantedBy=multi-user.target
这里有两个重要的参数:
Delegate: 这个选项设置为yes表示允许 containerd 以及运行时自己管理自己创建容器的 cgroups。如果不设置这个选项,systemd 就会将进程移到自己的 cgroups 中,从而导致 containerd 无法正确获取容器的资源使用情况。KillMode: 这个选项用来处理 containerd 进程被杀死的方式。默认情况下,systemd 会在进程的 cgroup 中查找并杀死 containerd 的所有子进程。KillMode 字段可以设置的值如下。control-group(默认值):当前控制组里面的所有子进程,都会被杀掉process:只杀主进程mixed:主进程将收到 SIGTERM 信号,子进程收到 SIGKILL 信号none:没有进程会被杀掉,只是执行服务的 stop 命令
我们需要将 KillMode 的值设置为 process,这样可以确保升级或重启 containerd 时不杀死现有的容器。
启动containerd
systemctl daemon-reload && systemctl enable containerd && systemctl start containerd
8.验证
$ ctr version
Client:
  Version:  v1.5.9
  Revision: 1407cab509ff0d96baa4f0eb6ff9980270e6e620
  Go version: go1.16.12

Server:
  Version:  v1.5.9
  Revision: 1407cab509ff0d96baa4f0eb6ff9980270e6e620
  UUID: 66736362-67e3-4dfd-933e-8852f0057173
9.卸载containerd
从 github 下载的 cri-containerd-cni-1.5.9-linux-amd64.tar.gz 压缩包解压缩后是 etc、 opt、 usr 3个目录,这3个目录内容如下
$ tree etc/ opt/ usr
etc/
├── cni
│ └── net.d
│ └── 10-containerd-net.conflist
├── crictl.yaml
└── systemd
└── system
└── containerd.service
opt/
├── cni
│ └── bin
│ ├── bandwidth
│ ├── bridge
│ ├── dhcp
│ ├── firewall
│ ├── flannel
│ ├── host-device
│ ├── host-local
│ ├── ipvlan
│ ├── loopback
│ ├── macvlan
│ ├── portmap
│ ├── ptp
│ ├── sbr
│ ├── static
│ ├── tuning
│ ├── vlan
│ └── vrf
└── containerd
└── cluster
├── gce
│ ├── cloud-init
│ │ ├── master.yaml
│ │ └── node.yaml
│ ├── cni.template
│ ├── configure.sh
│ └── env
└── version
usr
└── local
├── bin
│ ├── containerd
│ ├── containerd-shim
│ ├── containerd-shim-runc-v1
│ ├── containerd-shim-runc-v2
│ ├── containerd-stress
│ ├── crictl
│ ├── critest
│ ├── ctd-decoder
│ └── ctr
└── sbin
��└── runc
13 directories, 36 files
⚠️一般会将cri-containerd-cni-xxx-linux-amd64.tar.gz直接解压到根目录下,因此卸载continerd只需要删除相应文件即可
停止containerd服务
systemctl disable containerd && systemctl stop containerd && systemctl status containerd
删除目录、文件
rm -rf /etc/{cni,crictl.yaml,systemd/system/containerd.service} /opt/{cni,containerd} /usr/local/{sbin/runc,bin/{containerd,containerd-shim,containerd-shim-runc-v1,containerd-shim-runc-v2,containerd-stress,crictl,critest,ctd-decoder,ctr}}