[toc]
Ansible基础知识
1.Ansible基本概述
Ansible是一个配置管理系统configuration management system你只需要可以使用ssh访问你的服务器或设备就行
1.1 Ansible能做什么
ansible可以帮助我们完成一些批量任务,或者完成一些需要经常重复的工作。
-
比如:同时在100台服务器上安装nginx服务,并在安装后启动服务。
-
比如:将某个文件一次性拷贝到100台服务器上。
-
比如:每当有新服务器加入工作环境时,你都要为新服务器部署某个服务,也就是说你需要经常重复的完成相同的工作。
这些场景中我们都可以使用到ansible。
1.2 Ansible软件特点
-
ansible不需要单独安装客户端,SSH相当于ansible客户端。
-
ansible不需要启动任何服务,仅需安装对应工具即可。
-
ansible依赖大量的python模块来实现批量管理。
-
ansible默认配置文�件是
/etc/ansible/ansible.cfg
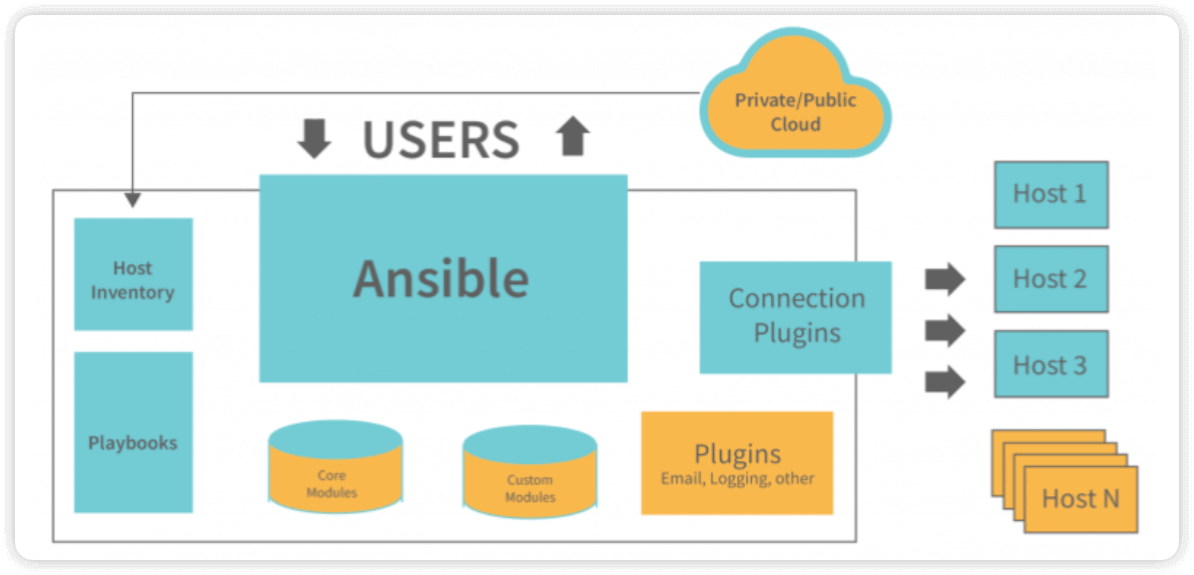
1.3 Ansible基础架构
-
连接插件(connectior plugins) 用于连接主机 用来连接被管理端
-
核心模块(core modules) 连接主机实现操作, 它依赖于具体的模块来做具体的事情
-
自定义模块(custom modules) 根据自己的需求编写具体的模块
-
插件(plugins) 完成模块功能的补充
-
剧本(playbooks)ansible的配置文件,将多个任务定义在剧本中,由ansible自动执行
-
主机清单(host inventory)定义ansible需要操作主机的范围
最重要的一点是 ansible是模块化的 它所有的操作都依赖于模块
2. Ansible安装配置
所有的受控主机必须与ansible服务端做ssh免密登陆
2.1 安装ansible(需要配置epel源)
yum -y install ansible
centos7.9安装的ansible版本为2.9.21
$ ansible --version
ansible 2.9.21
2.2 配置ansible
编辑主机清单文件
cat >> /etc/ansible/hosts<EOF
[host]
10.0.0.100
10.0.0.101
EOF

###############################
/etc/absible/hosts	ansible主机清单配置文件
[host]    主机清单名
10.0.0.100    主机IP地址1
10.0.0.101    主机IP地址2
2.3 验证ansible与受控机是否通信
# ansible是通过ssh端口探测通信
$ ansible all -m ping
10.0.0.101 | SUCCESS => {
    "ansible_facts": {
        "discovered_interpreter_python": "/usr/bin/python"
    },
    "changed": false,
    "ping": "pong"
}
10.0.0.100 | SUCCESS => {
    "ansible_facts": {
        "discovered_interpreter_python": "/usr/bin/python"
    },
    "changed": false,
    "ping": "pong"
}
2.4 ansible语法格式
命令 主机模块名 指定模块参数 模块名称 指定利用模块执行的动作选项 批量执行操作动作
$ ansible all -m command -a "hostname"
10.0.0.101 | CHANGED | rc=0 >>
jenkins
10.0.0.100 | CHANGED | rc=0 >>
gitlab-server

# 说明
all				模块名
-m				指定模块
command				command模块,完成基础命令
-a				指定执行动作
"hostname"				执行hostname命令
3.Ansible系列命令
3.1 ansiblie系列命令1:ansible
使用场景:
-
非固化需求
-
临时一次性操作
-
二次开发接口调用
使用示例
-
检查服务器存活状态
-
ansible all -m ping$ ansible all -m ping
k8s-node03 | SUCCESS => {
"ansible_facts": {
"discovered_interpreter_python": "/usr/bin/python3"
},
"changed": false,
"ping": "pong"
}
k8s-master01 | SUCCESS => {
"ansible_facts": {
"discovered_interpreter_python": "/usr/bin/python3"
},
"changed": false,
"ping": "pong"
}
k8s-node02 | SUCCESS => {
"ansible_facts": {
"discovered_interpreter_python": "/usr/bin/python3"
},
"changed": false,
"ping": "pong"
}
k8s-node01 | SUCCESS => {
"ansible_facts": {
"discovered_interpreter_python": "/usr/bin/python3"
},
"changed": false,
"ping": "pong"
}
-
3.2 ansiblie系列命令2:ansible-galaxy
命令作用:
- 根据下载量和关注量等信息,查找和安装优秀的roles
命令格式:
ansible-galaxy [init|info|install|list|remove] [ --help] [options] ...
命令分为3部分
1⃣️ 选项
| 选项 | 说明 |
|---|---|
| init | 初始化本地的roles配置,以备上传roles至galaxy |
| info | 列表指定role的详细信息 |
| install | 下载并安装galaxy指定的roles到本地 |
| list | 列出本地已经下载的roles |
| remove | 删除本地已经下载的roles |
2⃣️ help用法显示[--help]
ansible-galaxy init --help
3⃣️ 参数
ansible-galaxy init [options] role_name
3.3 ansiblie系列命令3:ansible-doc
命令作用:
- 模块文档说明
命令格式:
ansible-doc [options] [module]
示例:
# 列出ansible支持的 模块
ansible-doc -l

# 模块功能说明
ansible-doc ping
3.4 ansiblie系列命令4:ansible-playbook
命令作用:
- 读取预先编写好的playbook文件实现批量管理
命令格式:
ansible-playbook xxx.yaml
示例:
# 执行http_install.yaml这个playbook中定义的所有任务集
ansible-playbook http_install.yaml
3.5 ansiblie系列命令5:ansible-vault
命令作用:
- 用于配置文件加密
命令格式:
ansible-vault [encrypt|decrypt|create|edit|rekey|view] [--help] [options] file
示例:
a.yaml文件内容如下
# 安装apache
- hosts: web
  tasks:
    - name: install httpd
      yum: name=httpd state=installed
加密文件 ansible-vault encrypt a.yaml
$ ansible-vault encrypt a.yaml
New Vault password:
Confirm New Vault password:
Encryption successful
加密后查看a.yaml文件就会显示乱码
$ cat a.yaml
$ANSIBLE_VAULT;1.1;AES256
33666435656365396237363533616365346662373963393835376261333031356162373934383363
3633656532336436653261613539393532646131623433370a353865303931356131353065666261
35613738333338356635613337396565616663653366663134373537663935633134643734376333
6539333733353163380a356232663636343766313930636639383835656136623632393935636330
32386235313566383135386465613338346566623435363035646262356236393231353933396261
62626263613438313865666433323363636261616634613830623936393866616135663937386139
31636631313665613933393638663163393836386261316430353935363166633166383466363630
39333238623933613965333362396438303534363237393936393133636539633931306237366466
63303336336662346135356462316134616266366162316239373733636265633432
解密文件 ansible-vault decrypt a.yaml
$ ansible-vault decrypt a.yaml
Vault password:  # 这里输入密码
Decryption successful
查看解密后的文件
$ cat a.yaml
# 安装apache
- hosts: web
  tasks:
    - name: install httpd
      yum: name=httpd state=installed
4.Ansible正则
4.1 ALL全量匹配 all或*
匹配所有主机,all 与 * 号功能相同,但是*号需要用 "" 引起来
ansible all -m ping
$ ansible all -m ping
10.0.0.101 | SUCCESS => {
    "ansible_facts": {
        "discovered_interpreter_python": "/usr/bin/python"
    },
    "changed": false,
    "ping": "pong"
}
10.0.0.100 | SUCCESS => {
    "ansible_facts": {
        "discovered_interpreter_python": "/usr/bin/python"
    },
    "changed": false,
    "ping": "pong"
}
ansible "*" -m ping
$ ansible "*" -m ping
10.0.0.101 | SUCCESS => {
    "ansible_facts": {
        "discovered_interpreter_python": "/usr/bin/python"
    },
    "changed": false,
    "ping": "pong"
}
10.0.0.100 | SUCCESS => {
    "ansible_facts": {
        "discovered_interpreter_python": "/usr/bin/python"
    },
    "changed": false,
    "ping": "pong"
}
4.2 逻辑或匹配 :
同时对多台主机或多个组同时执行,相互之间用 : 分割,例如 jenking:gitlab
$ ansible jenkins:gitlab -m ping
jenkins | SUCCESS => {
    "ansible_facts": {
        "discovered_interpreter_python": "/usr/bin/python"
    },
    "changed": false,
    "ping": "pong"
}
gitlab | SUCCESS => {
    "ansible_facts": {
        "discovered_interpreter_python": "/usr/bin/python"
    },
    "changed": false,
    "ping": "pong"
}
4.3 逻辑非匹配 !
逻辑非用 ! 表示,主要针对多重条件的匹配规则
# 所有在a组但不在b组的主机
ansible a:!b -m ping
4.4 逻辑与匹配 &
逻辑与用 & 表示
# a组和b组中同时存在的主机
ansible a:&b -m ping
4.5 模糊匹配 *
* 通配符在ansible中表示0个或多个任意字符
# 所有以www开头.com结尾的主机
ansible www*.com -m ping
4.6 正则匹配 ~
~ 在ansible中表示正则匹配
//匹配www.a.com和www.b.com
⚠️注意 ~ 要在最前边,一定要加双引号
# 不加引号,会报错语法错误
$ ansible ~www\.(a|b)\.com -m ping
bash: syntax error near unexpected token `('

# 加引号,没有问题
$ ansible "~www\.(a|b)\.com" -m ping
www.b.com | SUCCESS => {
    "ansible_facts": {
        "discovered_interpreter_python": "/usr/bin/python"
    },
    "changed": false,
    "ping": "pong"
}
www.a.com | SUCCESS => {
    "ansible_facts": {
        "discovered_interpreter_python": "/usr/bin/python"
    },
    "changed": false,
    "ping": "pong"
}
5.Ansible清单管理
inventory文件通常用于定义要管理主机的认证信息, 例如ssh登录用户名、密码以及key相关信息。
主机
-
支持主机名通配以及正则表达式,例如
web[1:3].abc.com -
支持基于非标准的ssh端口,例如
web1.abc.com:6666 -
支持指定变量,可对个别主机的特殊配置,如登陆用户,密码等
主机组
- 支持嵌套组,例如
[game:children],那么在game模块下面的组都会被game所包含 - 支持指定变量,例如
[game:vars]在下面指定变量
主机清单文件内容官方示例模板
# This is the default ansible 'hosts' file.
#
# It should live in /etc/ansible/hosts
#
#   - Comments begin with the '#' character
#   - Blank lines are ignored
#   - Groups of hosts are delimited by [header] elements
#   - You can enter hostnames or ip addresses
#   - A hostname/ip can be a member of multiple groups

# Ex 1: Ungrouped hosts, specify before any group headers.

## green.example.com
## blue.example.com
## 192.168.100.1
## 192.168.100.10

# Ex 2: A collection of hosts belonging to the 'webservers' group

## [webservers]
## alpha.example.org
## beta.example.org
## 192.168.1.100
## 192.168.1.110

# If you have multiple hosts following a pattern you can specify
# them like this:

## www[001:006].example.com

# Ex 3: A collection of database servers in the 'dbservers' group

## [dbservers]
##
## db01.intranet.mydomain.net
## db02.intranet.mydomain.net
## 10.25.1.56
## 10.25.1.57

# Here's another example of host ranges, this time there are no
# leading 0s:

## db-[99:101]-node.example.com
常规写法
# 添加三台主机至webservers组
[webservers]
web1.abc.com
web2.abc.com
web3.abc.com

# 上边的写法可以简写成这样
[webservers]
web[1:3].abc.com
带密码写法
# 添加三台主机至webservers组
[webservers]
web1.abc.com ansible_ssh_pass='1'
web2.abc.com ansible_ssh_pass='1'
web3.abc.com ansible_ssh_pass='1'

# 上边的写法可以简写成这样
[webservers]
web[1:3].abc.com ansible_ssh_pass='1'

# 也可以写成如下形式
[webservers]
web1.abc.com
web2.abc.com
web3.abc.com
[webservers:vars]
ansible_ssh_pass='1'
多组写法
# 定义多组,多组汇总整合
[apache]
web1.abc.com
web2.abc.com
web3.abc.com
[apache:vars]
ansible_ssh_pass='1'

[nginx]
10.0.0.1
10.0.0.2
10.0.0.3
[nginx:vars]
ansible_ssh_pass='1'

# webservers组包括两个子组[apapche,nginx]
[webservers:children]
apache
nginx

ansible nginx --list-hosts
ansible apache --list-hosts
ansible websers --list-hosts
Ansible内置变量
| 参数 | 用途 | 示例 |
|---|---|---|
| ansible_ssh_host | 定义hosts ssh地址 | ansible_ssh_host=192.168.1.10 |
| ansible_ssh_port | 定义hosts ssh端口 | ansible_ssh_port=2222 |
| ansible_ssh_user | 定义hosts ssh认证用户 | ansible_ssh_user=user |
| ansible_ssh_pass | 定义hosts ssh认证密码 | ansible_ssh_pass=pass |
| ansible_sudo | 定义hosts sudo用户 | ansible_sudo=www |
| ansible_sudo_pass | 定义hosts sudo密码 | ansible_sudo_pass=pass |
| ansible_sudo_exe | 定义hosts sudo路径 | ansible_sudo_exe=/usr/bin/sudo |
| ansible_connection | 定义hosts 连接方式 | ansible_connection=local |
| ansible_ssh_private_key_file | 定义hosts 私钥 | ansible_ssh_private_key_file=/root/key |
| ansible_ssh_shell_type | 定义hosts shell类型 | ansible_ssh_shell_type=bash |
| ansible_python_interpreter | 定义hosts 任务执行python路径 | ansible_python_interpreter=/usr/bin/python2.7 |
| ansible_*_interpreter | 定义hosts 其他语言解析路径 | ansible_* _interpreter=/usr/bin/ruby |
6.Ansible Playbook
-
playbook是由一个或多个模块组成的,使用多个不同的模块,完成一件事情
-
playbook通过yaml语法识别描述的状态文件。扩展名是yaml或yml
6.1 YAML三要素
缩进
YAML使用一个固定的缩进风格表示层级结构,每个缩进由两个空格组成, 不能使用tabs
冒号
YAML使用一个固定的缩进风格表示层级结构,每个缩进由两个空格组成, 不能使用tabs
短横线
表示列表项,使用一个短横杠加一个空格
多个项使用同样的缩进级别作为同一列表
6.2 ansible playbook安装Apache示例
notify表示当配置文件发生改变时,触发handlers中name与notify名称相同的操作handlers表示当有notify触发时执行
# 安装apache
- hosts: web
  tasks:
    - name: install httpd
      yum: name=autoconf state=installed

    - name: configure httpd
      copy: src=./httpd.conf dest=/etc/httpd/conf/httpd.conf
      notify: restart httpd

    - name: start httpd
      service: name=httpd state=started enabled=yes

  handlers:
    - name: restart httpd
      service: name=httpd state=restarted